Hyundai Tucson: Rear Seat Belt / Rear Seat Belt Buckle
1.Disconnect the negative ( - ) battery terminal.
2.Open the rear seat front block cover, loosen the mounting bolts and then lift the rear seat assembly up.
Tightening torque :49.0 - 63.7 N.m (5.0 - 6.5 kgf.m , 36.2 - 47.0 lb-ft)
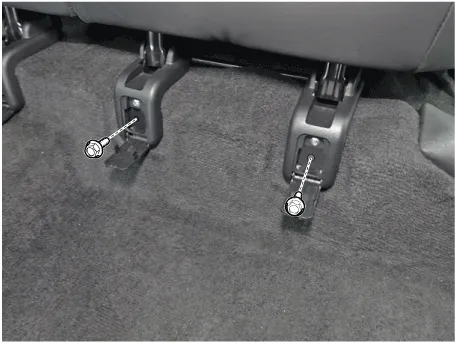

• Secure the rear seat cushion assembly so that it does not fall off.
3.Loosen the mounting bolt, remove the rear seat belt buckle (A).
Tightening torque : 39.2 - 53.9 N.m (4.0 - 5.5 kgf.m , 28.9 - 39.8 lb-ft)
4.To install, reverse removal procedure
1.Disconnect the negative ( - ) battery terminal.
2.Open the rear seat front block cover, loosen the mounting bolts and then lift the rear seat assembly up.
Tightening torque :49.0 - 63.7 N.m (5.0 - 6.5 kgf.m , 36.2 - 47.0 lb-ft)
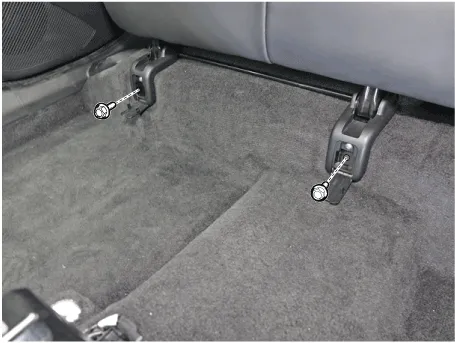

• Secure the rear seat cushion assembly so that it does not fall off.
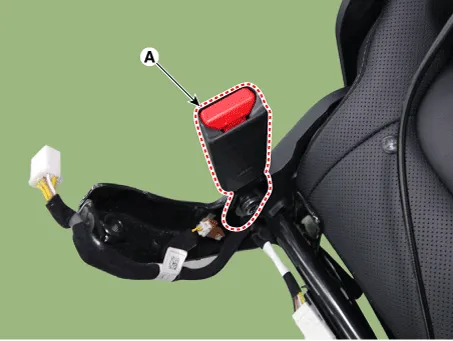
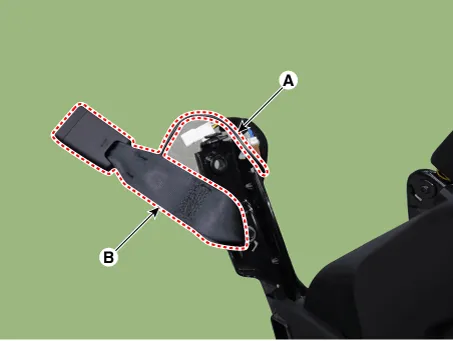
3.Disconnect the connector (A) and loosen the mounting bolt, remove the rear seat belt buckle (B).
Tightening torque : 39.2 - 53.9 N.m (4.0 - 5.5 kgf.m , 28.9 - 39.8 lb-ft)
4.To install, reverse removal procedure
1.Disconnect the negative ( - ) battery terminal.
2.Open the rear seat front block cover, loosen the mounting bolts and then lift the rear seat assembly up.
Tightening torque :49.0 - 63.7 N.m (5.0 - 6.5 kgf.m , 36.2 - 47.0 lb-ft)


• Secure the rear seat cushion assembly so that it does not fall off.
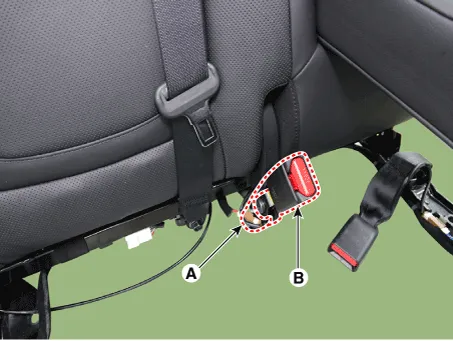
3.Disconnect the connector (A) and loosen the mounting bolt, remove the rear seat belt buckle (B).
Tightening torque : 39.2 - 53.9 N.m (4.0 - 5.5 kgf.m , 28.9 - 39.8 lb-ft)
4.To install, reverse removal procedure
 Rear Center Seat Belt Retractor
- Components Location
1. Rear center seat belt retractor
- Replacement
• When installing the belt, make sure not to damage the retractor.
1.Remove the rear seat ba ...

Other information:
Hyundai Tucson (NX4) 2022-2025 Owner's Manual: Front Lights
Map lamp 1 ():
Touch either button to turn on or off the
map lamp. This light produces a spot
beam for convenient use as a map lamp
at night or as a personal lamp for the
driver and the front passenger.
Door lamp 2 ():
The front or rear room lamps come on
when the front or rear doors ...
Hyundai Tucson (NX4) 2022-2025 Owner's Manual: Limitations of the System
Hyundai Digital Key app on the
smartphone and card key may not work if:
Hyundai Digital Key app is deleted.
Account login information for Hyundai
Digital Key app has expired.
Logged in with another smartphone
instead of the registered smartphone
with the same user account.
Smart ...
