
Hyundai Tucson: Controller / Heater & A/C Control Unit (Manual)
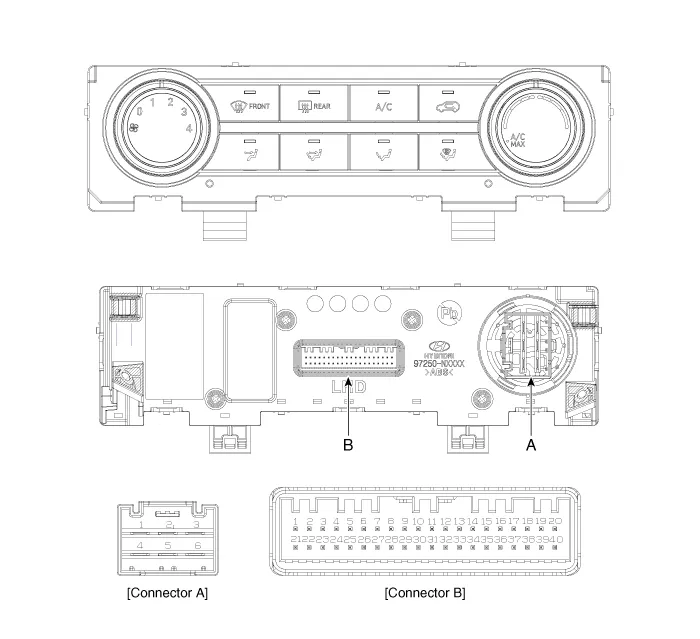
Connector Pin Function
| Pin No | Connector A (Blower) | Connector B (Main) |
| 1 | Low | Battery (+) |
| 2 | Common | ISG B+ |
| 3 | Ground | ILL+ (TAIL) |
| 4 | Middle Low | Sensor REF (+5V) |
| 5 | Middle High | Mode control actuator feedback |
| 6 | High | Temperature control actuator feedback |
| 7 | Intake actuator feedback | |
| 8 | Evaporator temperautre sensor (+) | |
| 9 | Ambient temperature sensor (+) | |
| 10 | Mode control actuator (Vent) | |
| 11 | Mode control actuator (DEF) | |
| 12 | Temperature control actuator (Cool) | |
| 13 | Temperature control actuator (Warm) | |
| 14 | Intake actuator (FRE) | |
| 15 | Intake actuator (REC) | |
| 16 | - | |
| 17 | - | |
| 18 | - | |
| 19 | Blower ON signal (Common) | |
| 20 | ILL - (RHEO) | |
| 21 | IGN2 | |
| 22 | IGN1 | |
| 23 | Blower INH | |
| 24 | Blower IS | |
| 25 | Blower PWM IN | |
| 26 | - | |
| 27 | Blower MAX signal | |
| 28 | IBU Active Low | |
| 29 | PTC realy 2 | |
| 30 | PTC ON signal | |
| 31 | - | |
| 32 | - | |
| 33 | CAN FD (High) | |
| 34 | CAN FD (Low) | |
| 35 | - | |
| 36 | Blower relay | |
| 37 | ECV (+) | |
| 38 | ECV (-) | |
| 39 | Sensor ground | |
| 40 | Ground |
1.Disconnect the negative (-) battery terminal.
2.Remove the front monitor.(Refer to Body Electrical System - "Front Monitor")
3.Remove the heater & A/C control unit (A).
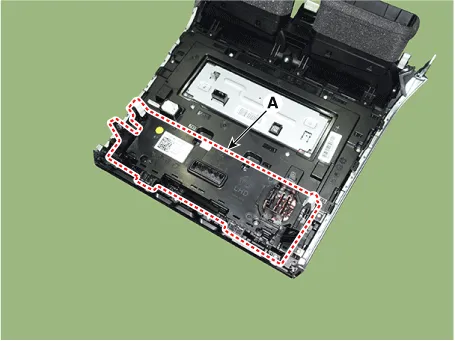
4.Install in the reverse order of removal.

• Replace any damaged clips.
• Make sure the connector is connected properly.
 Controller
...
 Heater & A/C Control Unit (DATC)
- Components
Connector Pin Function
Pin NoConnector A
1Battery (+)
2IGN2
3IGN1
4Local CAN (High)
5Local CAN (Low)
6In-car sensor (+)
7-
8Sensor ground
9ISG B+
10ILL+ (TAIL)
11-
12- ...
Other information:
Hyundai Tucson (NX4) 2022-2026 Service Manual: Components and Components Location
- Component Location
[Fuel Tank]
1. Fuel tank2. Canister3. Vapor hose4. Canister Close Valve (CCV)5. Vent hose6. Fuel filler hose7. Fuel tank air filter8. Fuel Tank Pressure Sensor (FTPS)9. Fuel Level Sender (FLS)10. Fuel pump11. Fuel filter12. Fuel pressure regulator
[High Pressure Fuel Li ...
Hyundai Tucson (NX4) 2022-2026 Owner's Manual: Limitations of the System
Hyundai Digital Key app on the
smartphone and card key may not work if:
Hyundai Digital Key app is deleted.
Account login information for Hyundai
Digital Key app has expired.
Logged in with another smartphone
instead of the registered smartphone
with the same user account.
Smart ...
