Hyundai Tucson: Brake System / Repair procedures
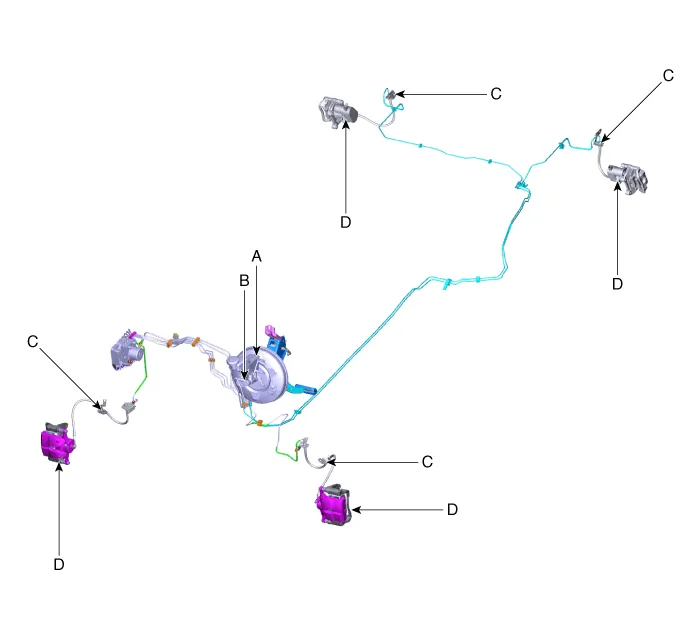
1.Brake Booster (A)
(1)Check brake operation by applying the brake during the test run. If the brake does not operate properly, replace the brake booster. If brake fluid remains inside the booster when disassembled, replace the booster and master cylinder.
2.Piston cup and pressure cup inspection (B)
(1)Check brake operation by applying the brakes. Look for damage or signs of fluid leakage. Replace the master cylinder as an assembly if the pedal does not work properly or if there is damage or signs of fluid leakage.
(2)Look for damage or signs of fluid leakage.
(3)Replace the master cylinder if it does not work properly or if it is damaged or leaking. If brake fluid remains inside the booster, replace the booster at the same time.
(4)Check for a difference in brake pedal stroke between quick and slow brake applications.
(5)Replace the master cylinder if there is a difference in pedal stroke.
3.Brake hoses (C)
(1)Look for damage or signs of fluid leakage.
(2)If there is damage or leakage, replace the brake hose and washer with new ones.
4.Caliper piston seal and piston boots (D)
(1)Check brake operation by applying the brakes.
(2)Look for damage or signs of fluid leakage. If the pedal does not work properly, the brakes drag, or there is damage or signs of fluid leakage, disassemble and inspect the brake caliper. Replace the boots and seals with new ones whenever the brake caliper is disassembled.

 Brake System
...
 Brake Booster
- Components
1. Reservoir cap2. Reservoir3. Brake booster4. Master cylinder5. Push rod
- Brake Booster Operating Test
1.Run the engine for one or two minutes, and then stop it. If the
...
Other information:
Hyundai Tucson (NX4) 2022-2026 Service Manual: Description and Operation
- Description
Body Control Module Controls The Followings
– Wiper & Washer Control
– Defroster Control
– Driving Control
– Liftgate Control
– Window Control
– Interior Control
– Exterior Control
– Panic alarm Control
– MTS
– Flasher output Cont ...
Hyundai Tucson (NX4) 2022-2026 Service Manual: Troubleshooting
- Troubleshooting
• The battery must be in good condition and fully charged for this troubleshooting.
Trouble symptomProbable causeRemedy
Engine will not crankBattery charge lowCharge or replace battery
Battery cables loose, corroded or worn outRepair or replace cabl ...
