Hyundai Tucson: Emission Control System / Crankcase Emission Control System
Description and Operation
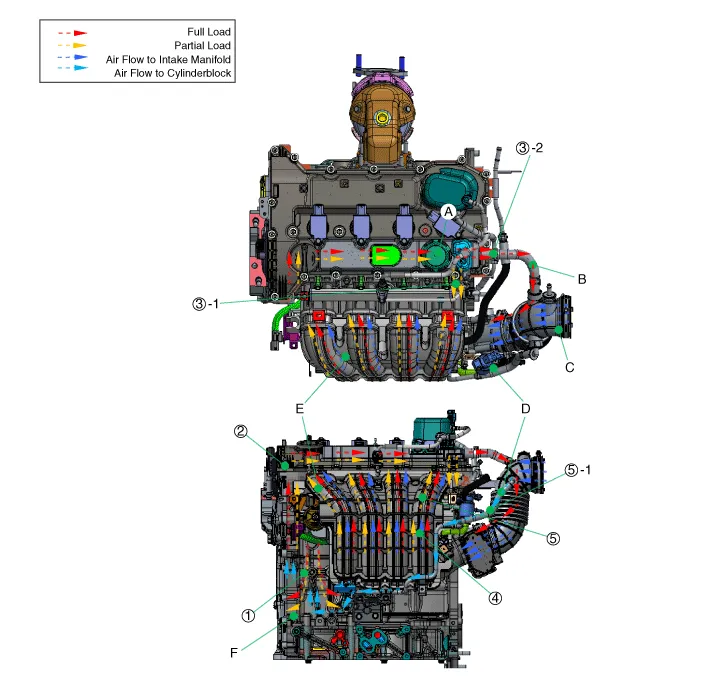
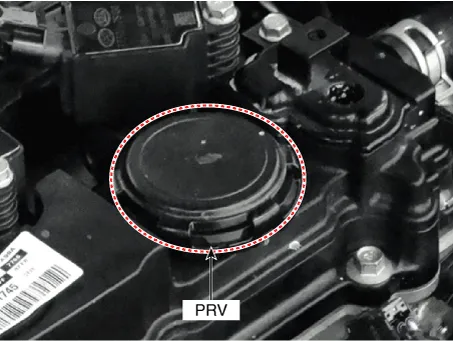
A : Crankcase pressure regulating valve (PRV)
B : Breather hose
C : Intake hose
D : Air flow
E : Intake manifold
F : Cylinder block
①Blow-by gas flow② Blow-by gas inflow to the cylinder head cover throungh the cylinder block & head & chain cover③-1 In the partial load area, blow-by gas inflow to the intake manifold through the PRV valve which in the head cover.③-2 In the full load area, blow-by gas inflow to the intake hose through the PRV valve which in the head cover.④ Mix of intake hose and blow-by gas. Blow-by gas is circulated by the ③-1, ③-2 procedure.⑤ Combustion the air-flow mixture.⑤-1 Air flow to cylinder block.
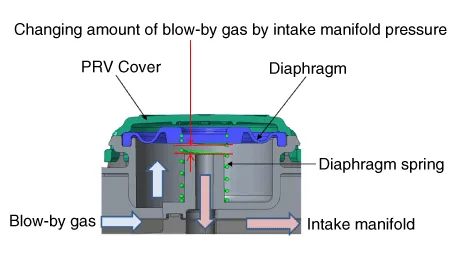
Positive Crankcase Ventilation (PCV) Valve
| Engine condition | Stop | Idle or Deceleration | Normal operating condition | Accelerating in the high load area |
| Intake manifold pressure | 0 | High | Appropriate | Low |
| PRV (Diaphragm) | Full open | A little open | Appropriate open | Considerable open |
| Amount of blow-by gas | 0 | A little | Middle | A lot |
| Diaphragm component part |
| |||
1.Remove the cylinder head cover.Refer to Engine Mechanical System - "Cylinder Head Cover")
1.Install in the reverse order of removal.
Crankcase Check Valve

• Be careful not to damage the parts located under the vehicle (floor under cover, canister, fuel tank) when raising the vehicle using the lift.(Refer to General Information - "Lift and Support Points")
1.Disconnect the battery (-) terminal.
2.Remove the engine room under cover.(Refer to Engine And Transaxle Assembly - "Engine Room Under Cover")
3.Remove the drive belt.(Refer to Drive Belt System - "Drive Belt")
4.Remove the compressor mounting bolts.(Refer to Heating, Ventilation and Air Conditioning - "Compressor")
5.Disconnect the crankcase check valve hose (A) and then remove the crankcase check valve (B).
Tightening torque : 9.8 - 11.8 N.m (1.0 - 1.2 kgf.m, 7.2 - 8.7 lb-ft)
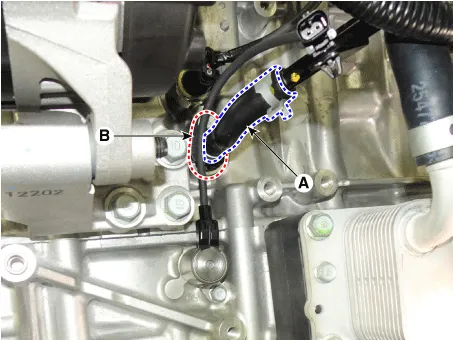

• Push the check valve to the end of the mounting surface, and then tighten the bolt.
 Components and Components Location
- Components Location
1. Crankcase pressure regulating valve (PRV) 2. Purge control solenoid valve (PCSV)3. Canister4. Canister Close Valve (CCV)5. Fuel Tank Pressure Sensor (FTPS)6. Fuel tank a ...
Other information:
Hyundai Tucson (NX4) 2022-2026 Owner's Manual: Safe Exit Warning Operation
Collision warning when exiting your
vehicle
When an approaching vehicle from
the rear is detected while a door is
being opened, the warning light on the
side view mirror may blink, a warning
message may appear on the instrument
cluster, and an audible warning may
sound.
Safe E ...
Hyundai Tucson (NX4) 2022-2026 Owner's Manual: Good Driving Practices
Never shift the gear from P (Park) or N
(Neutral) to any other gear when the
accelerator pedal is depressed.
Never shift the gear into P (Park) when
the vehicle is moving. Completely
stop before shifting into R (Reverse) or
D (Drive).
Do not shift to N (Neutral) when
driving ...
